Thursday, April 30, 2009

Next Mondays Card Class Sneak Peak

Sorry I have been MIA. I have been suffering with a cold. You know the runny nose etc. etc. Anyway I feel a little better today and I needed to get some cards done for my Monday card class. While they are not outstanding I think they are nice.


The first one is done using the Baroque Motifs. You can do so much with this set just by changing the colors of the flowers. I also fine it works very well on scrapbook pages.


Recipe:

Stamp Sets: Baroque Motifs, SAB Set Congrats

Ink: Sahara Sand, Black

Card Stock: White, Sahara Sand, Elegant Eggplant


The other card I have planned uses some retired DSP. I decided not to put a sentiment because it could be for many occasions. While I used mostly retired items I still love the color River Rock and we do have to use our previously purchased items up. This color combination could easily be changed to what ever you may have on hand new or old. I am working on not hoarding so much stuff just because I like it so much. LOL


Recipe:

Stamp Set: Flowers in Silhouette, Canvas Background

Card Stock: Always Artichoke, River Rock and River Rock DSP

Ink: River Rock, Black

Accessories: River Rock Ribbon


Thanks for looking and I really am appreciating all the comments.


Monday, April 27, 2009

Stamp Club Projects

Hello stampers,

I hope you had a great weekend. I was busy helping my daughter find a place to live. They are moving back to Manitoba this summer and there has not been a lot of properties to look at. I guess with all the flooding people just are not putting their properties on the market. But I think they may have found something that is really close by.

My projects that I am showing you today are my stamp club projects. Several of the ladies purchase the Big Shot and I want them to learn more about using the machine as well as trying out some of the new dies.


The dies I used were the Match Box( inside the box are four Hersey Nuggets that have also been wrap in the DSP), Baskets and Blooms (there is a rectangle box between the basket shapes) and The Manhattan Flower Embossing folder. They are also going to do a 8 x 8 scrapbooking page using the embosslits.


The DSP is from Walk in the Park, the colors for the card stock were basic Grey, Baja Breeze, Kiwi Kiss, Chocolate Chip for the daisy centers and White. I used the retired ribbon Blue Bayou. I also positioned the dimensionals so that the photo could slip underneath the leaves. I think it turned out rather nice. Thanks for stopping by.


Friday, April 24, 2009

Candy Lane DSP Scrapbook Layout


Hi Stampers,

I am sharing one of the layouts that I had previously mentioned that I had started at the day long Scrapagandza last Saturday.

The main paper in this layout is Candy Cane Lane the pinks, and reds in this series are really nice. I am a pink/red girl. I think the greens are a retired series paper River Rock.

The embelisments on this page are regular buttons, the Stampin Up die Scribbles and I punched out a tab with the tab punch from Stampin Up.

I usually only like one or two pictures per page these days. I have left these blank for demo purposes.

One the second page of the layout, I did a color block idea, I used blocks of paper to fill the 12 x 12 card stock. I also made a flower embellisment by punching out several layers of three different punches, cutting the edges of each petal, sponging them and then putting them all together with a brad and turning the flowers so they showed all the petals. I put a oval frame for some journalling or perhaps another picture. It looks of centre in the picture but it is straight. I used the negative from the previously cut die to sponge the Scribbles in the bottom corners of the picture frame in Red Riding Hood Ink.

I really wish you could see these in real life they are so much prettier than on here. Oh well on to my next project. Thanks for looking and commenting . Bye for now.


Thursday, April 23, 2009

Baby Card

Hi Stampers.

This card did not quite turn out as I had planned. But thats the way it goes sometimes. At first I had a plain white background but it looked unfinished so I decided that some clouds and ground would maybe make it look a bit better.


I really had something else in mind but I just could not get it right on paper. Don't you just hate days like that.

Supplies

Stamps: Forest Friends
Papers: Whisper White, Pink Pirouette, Chocolate Chip
Inks: Chocolate Chip, Basic Grey, Stampin Up Markers Always Artichoke, Chocolate Chip
Accessories: sponges, computer generated greeting.

The stamp set is called Forest Friends. You can create a forest using the tree in the Forest Friends stamp set, and then add a few furry creatures. You'll adore these precious images and the creative options you'll find when you color them using Stampin' Write markers. The price of this stamp set is $19.95 set of four.


Wednesday, April 22, 2009


Hi Stampers,

I have been waiting to use this set for some time and today was the day. I love this set so much "Thoughts and Prayers" that I have lovingly looked at it each day just waiting for the right time to use it.


The sentiments that come with it are so awesome.
I use a card base of Chocolate Chip, I cut out a top note using Pink Pirouette. The branch was colored with Stampin Up Markers. The colors I used were Regal Rose and Always Artichoke. I also sponged the edges of the top note with Regal Rose.

When I stamped the Happy Mothers day I first inked it in Regal Rose then I tapped it into Chocolate Chip you may not be able to see it but it kinda has a pink/brown modeled look to it. I also had pressed a little bit to hard and got a line over the "ers" so I had to add another flower to cover it. It doesn't look to bad. I punched to small very small butterflies sponged the edges with Regal Rose and added two rhinestones to each butterfly. I had this bow made from some previous adventure and thought it looked ok too.

On the inside I layered a piece of white card stock 4 x 5 1/4 and inked up the stamp again stamped once on scrap paper then onto the card stock for a soft look. Sorry about the poor picture quality I have done something to my camera and I just can't seen to get good pictures any more. Thanks for looking and thank you for all the comments I love to read them.


Tuesday, April 21, 2009

Mom and Tots Group Workshop Cards

I am having a workshop on Thursday with a group of ladies from a Mom and Tots type group. These are the cards that I designed for them. I was not sure at which level they all were so I thought I would make one card that was not to complex and then move on to one that had a bit more WOW to it.


The first card that they will be doing is the Birthday Card. I used the bird from the Pun Fun set and the balloon from Crazy for Cupcakes. I really like this balloon. The bird was stamped first then the balloon was added to its' hand. I used the watercolor pencils to color the balloon and the bird. Blending the color with one of the Stampin Up blender pens. Added some two way glue to the balloon then some dazzling diamond. I tied the matching ribbon Pacific Point around the bottom and added it to the Pacific Point layer which was then adhered to the card base. I think he is cute. What about you?


The next card is for Mother's Day. I used a 5 1/2 x 4 1/4 white card stock base . The DSP is from a retired SU paper pack but any DSP could be used the size is 4 1/4 x 3. I added a strip of Pretty in Pink scalloped with the new lacy border punch from Stampin Up. This piece is adhered to the bottom of the white base, but you do not glue all the way up because the top piece slides underneath the scallop part.


The top Pretty in Pink piece is 4 1/4 x 3 and I stamped the leave stamp from Great Friend with Versa Mark. Then I stamped the Butterfly from the same set in Pretty in Pink and used a sponge dauber to add the brown to the edges for a nice effect. I layered this onto a piece of Pretty in Pink. I tied the ribbon around the top piece moved it about 3/4 of the way down adhered the butterfly at the top only so that it goes over the bottom portion of the card.


I punched a 1/16 hole on the side through all the layers and added the brad so that the top can open and close.


Monday, April 20, 2009

Fifth Avenue Floral Class

Add a touch of elegance and class to your Mother’s Day gift this year with this gorgeous Fifth Avenue Floral card set! The card set includes four trendy card designs packaged in a unique window box.


Date: Sunday May 3rd
Time: 2:30
Cost: $25.00
Location: Peggy's


Please email me to sign up for this class: (gatchell@mts.net)


Supplies required:
Please bring you double sided adhesive.


Sunday, April 19, 2009

Yesterday I attended a scrapbooking crop at a neighbouring town called Scrapagandza. We were there for 7:30 am because we wanted to get good seats. It was very cold but well worth the wait. It was good to see old friends that I have seen many times at this event.

I wanted to be completely organized for this crop, as like most scrapbookers who attend these all day events. It was important to me not to take my entire stamp/scrap room with me so I took all week preparing pages making sure I had the ribbon, the pieces cut etc. I tried to make sure that I had everything I needed and a second project just in case I was so organized that I would be finished with time left over. Well I did accomplish assembling my pages. Got out my big shot to start to make the embellishments that I wanted to put on the pages only to discover that I had not packed any card stock or scraps to do this with. What a BUMMER. I refused to purchase any card stock that may have been available as I have so many scraps that would have been perfect for what I wanted.

While at the crop I had several ladies come up to me and tell me how much they enjoyed my blog and how much they look forward to seeing my new cards and projects. I was blown away, I did not realize I had such a following. Thank you ladies. I also had alot of compliments on my almost complete pages and I will share them with you once I get the embellishments on them.

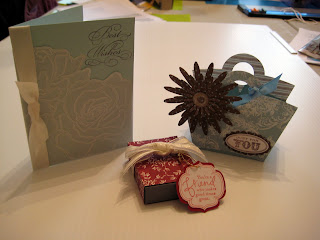
So for all my slacking off this last week I am posting three pictures.

This first card is for the Late Night Stampers Challenge which is due by tonight, nothing like waiting to the last minute. LOL I used the swirl from the Baroque Motifs stamp set, stamped in Black. I stamped the outline flowers from the Sellabration set Botanical Blooms, watercolored them and cut them out. Oh, that was the other compliment I got, I was told I was the watercolor queen of the Interlake, Image that! I then randomly placed them on the swirl. I added crystal effects to the flowers and a little bit of dazzling diamonds glitter. Sponged the edges with Creamy Caramel and layered it on a piece of Kiwi Kiss followed by Night of Navy.


The next two cards are ones that I will be teaching tomorrow at the Matlock Rec Centre. The Flight of the Butterfly is a 6 1/4 by 3 1/4 card. I used Chocolate Chip, Pumpkin Pie and Always Artichoke card stock, the DSP is also Always Artichoke and Pumpkin Pie. The ribbon is Saffron Yellow. I punch the little flowers from the three flower Stampin Up punch and used the 1/8 punch for the centers. This size card fits perfectly in the small envelopes that you can purchase almost anywhere.

The second card that we will be doing is from a retired set called Live Your Dream. I will never sell this set. It is one of my favourites. For this card I used Basic Grey as my base layer followed by Bashful Blue and second layer of the same colors going horizontally across and added three silver brads. The third layer uses Basic Grey, Bashful Blue and White. I stamped the image on the white using the Stampin Up markers. Colored the flower part again and stamped the flowers on a scrap piece of white and cut them out. I positioned them on top of the first image with a dimensional.
Thank you to all of you who take a interest in my blog, I am so blessed to have you visit my blog I will try harder to keep it up. Thanks again.

Monday, April 6, 2009

Hi fellow stampers, I am preparing some ideas for my big shot class that I have coming up. This card features that Little Leaves sizzlet from Stampin Up. These dies are approximately 3" in diameter and there are many to choose from.

I used the Sellabration DSP for the vertical and horizontal pieces. Most of them were scraps from other projects. The Blue vertical piece was cut at 2 1/2 by 5, the yellow pattern piece was a scrap that measures approximate 1/2" by 5 1/2". The tag was approximately 2" x 3 1/2", I used the used the tag corner punch on one end to make it look like a tag. I also used the double slot punch to make the faux bow.

I cut three Little Leaves and reversed sides to make them bend the direction I wanted them to go in. I added three dots using Brocade Blue ink and the flower centre from Heartfelt Thanks.
I stamped the flower from the Polka Dot Punches Sellabration set, punched it out with the Petal Punch and set it on the leaves. I also drew veins on the leaves with a pencil. Thanks for looking.