Showing posts with label Paisley Petals. Show all posts

Friday, November 25, 2011

A Clean and Simple Card

I have never really made a true clean and simple card before.

In my endeavours to try to stamp more often I am allowing myself to do what ever I feel like on my cards. I am a Stampin Up demo, but my customer base is low and I think I am turning into a hobby demo. So I am just going to enjoy the journey as they say.

I said all of that because I used Copic Markers to color my stamped image. Everything else is Stampin Up. I tried to copy the colors used in the DSP Paisley Petals with the colors I have in the markers. I do not own hundreds like some. But I do enjoy coloring tight spots with them like the stamped image on this card. I tried to moddle the inside of the big leaves like the paper but it did not quite come out like I had hoped but it still looks pretty good in my opinion.


The only other thing I did was to add the DSP on the bottom and punch it with the Scallop Border punch and I added some stitching with my white Signo Pen after I got it to work another neglected item that was found. Oh and I rounded the top of the card, again, something I seldom do but looks good here.


Stamps: Paisley Petals, Field Flowers

Paper: Whisper White, DSP Paisley Petals

Ink: Black, Copic Markers

Accessories: Scallop Border Punch, Signo Pen, Corner Rounded Punch

Saturday, April 9, 2011

Friends Never Fade Meets Paisley Petals

Hello stamping friends, sorry for the MIA. Unfortunately life does demand more of us than stamping. For the life of me I don't know why!!!

One of my most favourite things to do in the evening is blog surf for ideas. I particularly like to look at other stamping company blogs because I want to challenge myself to use Stampin Products to somewhat reproduce what they have done with non Stampin Up products. Sometimes it works, sometimes it does not.

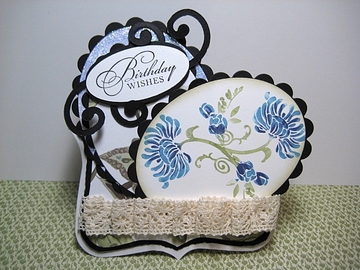
This is my card for today, while Chris Olsen's looks spectacular I think mine looks pretty good too! It is all Stampin UP except for the large ovals.

Here is my card:


I used the Top Note die to make my card base, this was probably the most time consuming part to get three layers. Then I cut out my black scalloped ovals with my Nestabilities.

Cut a piece of DSP from Paisley Petals and put those layers together. Cut another oval from Whisper White and I used the 2 way glue stick and added  Stampin Up Fine Cosmo glitter to the edge.

I colored the image from Friends Never Fade with Stampin Up Markers and stamped it twice in opposite directions and cut it out the Nestabilities. I sponged the edge with River Rock ink and then layered it on the Black Scalloped Oval.

After I stamped the Birthday greeting I cut it out with the large oval punch, I also punched two ovals in black and placed them behind the sentiment to give it a layered look. I cut two swirls from the Swirls Scribbles die and put one on each end of the sentiment layer. Finally I added some of the Stampin Up lace across the bottom.

There was still some ink left on the image stamp and I stamped that on the inside of the card.


Here is Chris's card:


Thanks for stopping by, have a great weekend.